The Best Fluffy Pancakes recipe you will fall in love with. Full of tips and tricks to help you make the best pancakes.
The first time I made Matilda’s Chocolate Cake recipe, I couldn’t stop thinking about that unforgettable chocolate cake scene from the movie Matilda. You know the one—the giant, rich, impossibly chocolatey cake that Bruce Bogtrotter somehow managed to finish in front of the entire school. It looked so decadent that I always wondered what it would taste like in real life.
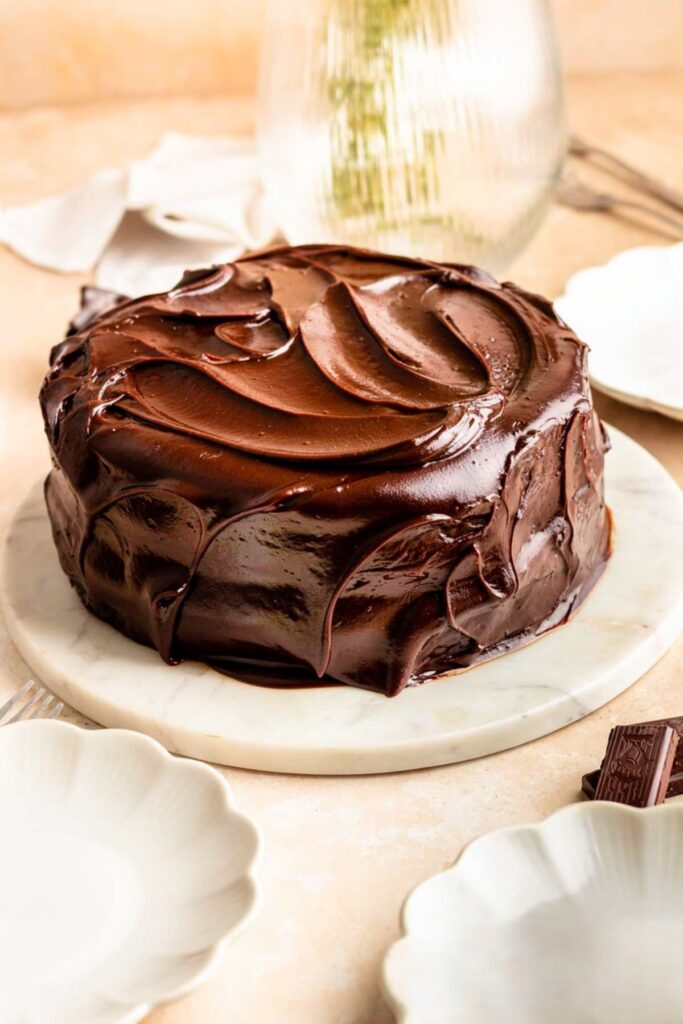
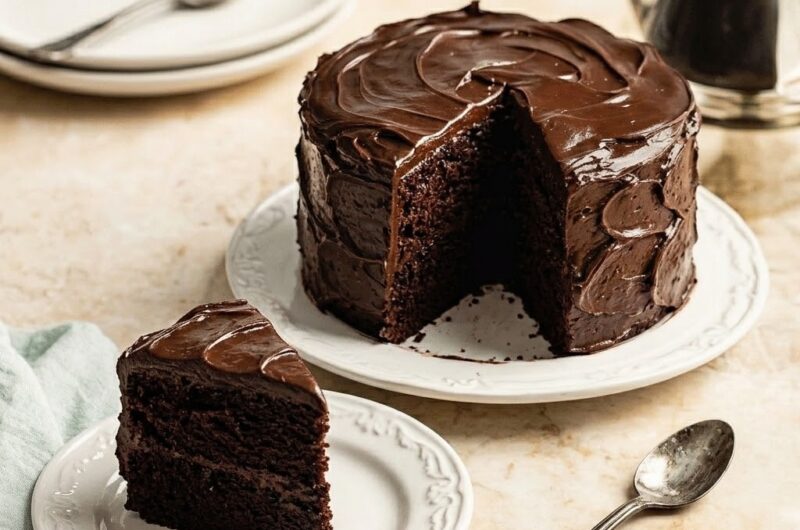
Jump to RecipeThis cake is deeply chocolatey, incredibly moist, packed with luscious frosting, and every bite feels like pure chocolate heaven. If you’ve ever wanted to recreate that iconic movie cake in your own kitchen, this recipe comes surprisingly close.
Quick Recipe Info
I make this cake whenever I want a truly special dessert. It’s rich enough for celebrations but simple enough to make at home without any complicated techniques.
- Prep Time: 30 minutes
- Cook Time: 35 minutes
- Total Time: 1 hour 5 minutes
- Servings: 16 slices
- Calories: 620 per serving
- Protein: 7g
- Gluten-Free: No
- Dairy-Free: No
- Vegan: No
- Meal Prep Friendly: Yes
Why You’ll Love This Recipe
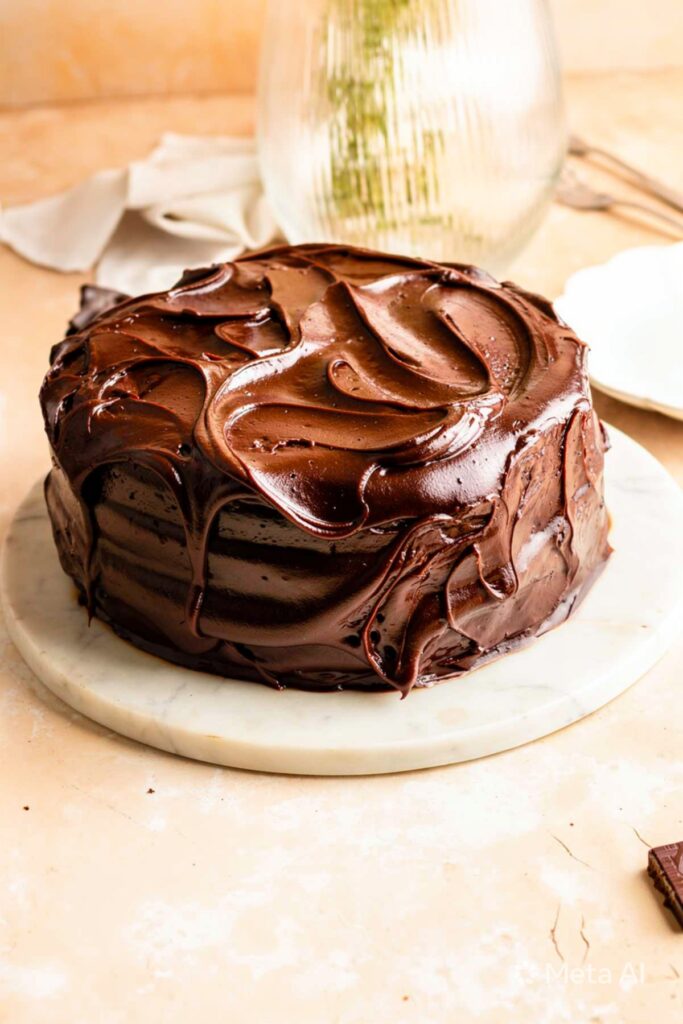
One of my favorite things about this cake is how closely it matches the feeling of the movie version. It’s big, dramatic, chocolate-packed, and guaranteed to impress anyone who sees it.
- Intensely rich chocolate flavor
- Moist and tender crumb
- Thick, creamy chocolate frosting
- Perfect for birthdays and celebrations
- Beginner-friendly recipe
- Uses easy-to-find ingredients
- Looks incredibly impressive
- Great for making ahead
- Family-approved dessert
- Delivers serious chocolate cake nostalgia
Ingredients You’ll Need
The ingredient list is fairly straightforward, but every item plays an important role in creating that signature rich texture and deep chocolate flavor.
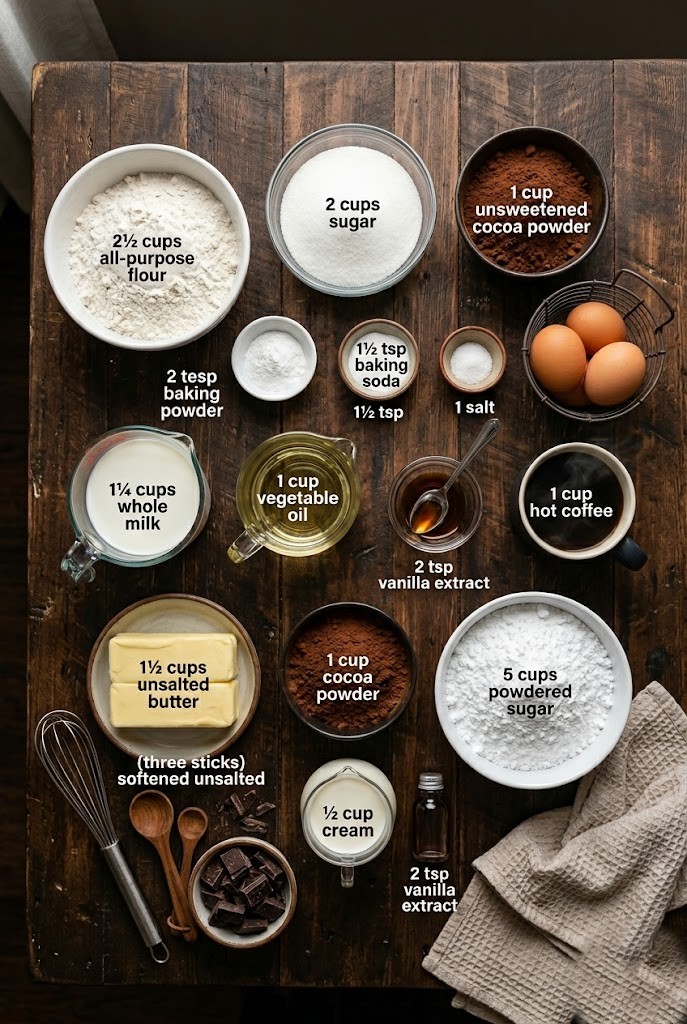
All-Purpose Flour – 2½ cups
Flour provides the structure for the cake layers. Measuring accurately helps create a soft texture without making the cake dense.
Granulated Sugar – 2 cups
Sugar sweetens the cake while also helping keep it moist. It contributes to the tender crumb that makes this cake so satisfying.
Unsweetened Cocoa Powder – 1 cup
This is where most of the chocolate flavor comes from. Use a high-quality cocoa powder for the richest result.
Baking Powder – 2 teaspoons
Baking powder helps the cake rise evenly and creates a lighter texture.
Baking Soda – 1½ teaspoons
Combined with the other ingredients, baking soda helps produce a fluffy and tender crumb.
Salt – 1 teaspoon
A small amount of salt balances the sweetness and enhances the chocolate flavor.
Large Eggs – 3
Eggs provide structure, moisture, and richness while helping the cake bake evenly.
Whole Milk – 1¼ cups
Milk adds moisture and contributes to the soft texture of the finished cake.
Vegetable Oil – 1 cup
Oil helps keep the cake incredibly moist, even days after baking.
Vanilla Extract – 2 teaspoons
Vanilla rounds out the chocolate flavor and adds warmth to every bite.
Hot Coffee – 1 cup
Coffee intensifies the chocolate flavor without making the cake taste like coffee. This is one of my favorite baking tricks.
Chocolate Frosting Ingredients
Unsalted Butter – 1½ cups
Butter creates a rich and creamy frosting with plenty of flavor.
Unsweetened Cocoa Powder – 1 cup
Adds deep chocolate flavor and gives the frosting its dark color.
Powdered Sugar – 5 cups
Creates the smooth, fluffy texture that makes the frosting spreadable.
Heavy Cream – ½ cup
Heavy cream adds richness and helps achieve a silky consistency.
Vanilla Extract – 2 teaspoons
Enhances the overall flavor and balances the chocolate.
Optional Add-Ins
- Chocolate chips
- Dark chocolate chunks
- Espresso powder
- Chocolate curls for decoration
- Mini chocolate bars between layers
How to Make It
I usually bake the cake layers first and prepare the frosting while they cool. The process is simple, but taking your time helps create the most impressive result.
Step 1: Prepare the Cake Pans
Preheat your oven to 350°F (175°C). Grease and line two 9-inch round cake pans with parchment paper to prevent sticking.
Step 2: Mix the Dry Ingredients
In a large bowl, whisk together 2½ cups flour, 2 cups sugar, 1 cup cocoa powder, 2 teaspoons baking powder, 1½ teaspoons baking soda, and 1 teaspoon salt until evenly combined.
Step 3: Add the Wet Ingredients
Add 3 eggs, 1¼ cups milk, 1 cup vegetable oil, and 2 teaspoons vanilla extract. Mix until the batter becomes smooth and fully combined.
Step 4: Pour in the Hot Coffee
Slowly stir in 1 cup hot coffee. The batter will look quite thin, which is exactly what you want for a moist chocolate cake.
Step 5: Bake the Layers
Divide the batter evenly between the prepared pans. Bake for 30 to 35 minutes or until a toothpick inserted in the center comes out with only a few moist crumbs.
Step 6: Cool Completely
Allow the cakes to cool in their pans for 15 minutes before transferring them to wire racks. Let them cool completely before frosting.
Step 7: Make the Chocolate Frosting
Beat 1½ cups softened butter until creamy. Add 1 cup cocoa powder and mix well. Gradually add 5 cups powdered sugar, alternating with ½ cup heavy cream. Finish with 2 teaspoons vanilla extract.
Step 8: Assemble the Cake
Place one cake layer on a serving plate. Spread a thick layer of frosting over the top before adding the second layer.
Step 9: Frost the Entire Cake
Cover the top and sides with the remaining frosting. Don’t be shy here—the movie cake was famously loaded with chocolate frosting.
Step 10: Chill and Serve
Refrigerate the cake for about 20 minutes to help the frosting set. Slice generously and enjoy.
Nutrition Breakdown
This isn’t an everyday health-food dessert, but it is deeply satisfying. A small slice goes a long way thanks to its rich ingredients and generous frosting.
| Nutrient | Amount Per Serving |
|---|---|
| Calories | 620 |
| Protein | 7g |
| Carbohydrates | 82g |
| Fat | 31g |
| Fiber | 4g |
| Sugar | 58g |
The eggs and milk contribute most of the protein, while cocoa powder provides a small amount of fiber. Butter and oil create the rich texture that makes each bite feel indulgent and satisfying.
Because the cake is so rich, most people find that a single slice is more than enough to satisfy a chocolate craving.
Substitutions and Variations
I occasionally adjust the recipe depending on what I have available, and a few substitutions work surprisingly well.
Instead of Whole Milk
You can use buttermilk for a slightly tangier flavor and even softer crumb. The cake becomes a bit more tender.
Instead of Vegetable Oil
Canola oil works almost identically. Melted coconut oil can also be used but may add a subtle coconut flavor.
Instead of Hot Coffee
Hot water can be substituted if preferred. The cake will still be delicious but won’t have quite the same depth of chocolate flavor.
Instead of All-Purpose Flour
A quality 1-to-1 gluten-free flour blend can be used. The texture may be slightly more delicate.
Make ahead Tips
I often make this cake a day before serving because the flavor becomes even better overnight. The frosting also firms up nicely, making slicing easier.
Store slices in airtight containers or keep the entire cake covered in a cake carrier. Individual portions are convenient for parties and celebrations.
The cake stays fresh for about 4 days in the refrigerator and maintains excellent texture throughout that time.
Easy Variations
Once you’ve made the classic version, there are several fun ways to customize it.
Higher Protein Version
Replace part of the frosting with a chocolate Greek yogurt frosting and add an extra egg to the batter.
Lower Sugar Version
Reduce the sugar in the cake by about ¼ cup and use a less-sweet frosting recipe.
Dark Chocolate Version
Use dark cocoa powder and add ½ cup melted dark chocolate to the batter.
Triple Chocolate Version
Fold 1 cup chocolate chips into the batter and decorate the finished cake with chocolate curls.
Serving Ideas
I love serving this cake slightly chilled because the frosting becomes extra fudgy and rich. The texture reminds me even more of the famous movie cake.
Serve it with:
- Cold milk
- Fresh strawberries
- Vanilla ice cream
- Whipped cream
- Hot coffee
- Chocolate milkshakes for an over-the-top dessert experience
For birthday parties, I sometimes decorate the cake with extra chocolate curls to recreate the dramatic look from the movie.
Storage and Leftovers
This cake stores remarkably well, which is great because the recipe makes a generous amount.
Refrigerator Storage
Keep the cake covered in an airtight container or cake carrier. It will stay fresh for up to 4 days in the refrigerator.
Freezer Storage
Cake layers freeze beautifully for up to 3 months. Wrap them tightly in plastic wrap and place them in freezer-safe bags.
Reheating Instructions
This cake is typically served at room temperature. Remove refrigerated slices about 20 minutes before serving for the best texture and flavor.
The Famous Matilda Chocolate Cake Recipe
Course: DessertsCuisine: AmericanServings
15
servingsPrep time
30
minutesCooking time
35
minutesCalories
620
kcalTotal time
1
hour5
minutesInspired by the famous chocolate cake from the movie Matilda, this rich and decadent layer cake features moist chocolate cake layers covered in a thick, creamy chocolate frosting. It’s the ultimate dessert for chocolate lovers and perfect for birthdays, celebrations, or whenever you’re craving an unforgettable chocolate cake.
Ingredients
For the Chocolate Cake:
2½ cups all-purpose flour
2 cups granulated sugar
1 cup unsweetened cocoa powder
2 teaspoons baking powder
1½ teaspoons baking soda
1 teaspoon salt
3 large eggs
1¼ cups whole milk
1 cup vegetable oil
2 teaspoons vanilla extract
1 cup hot coffee
For the Chocolate Frosting:
1½ cups unsalted butter, softened
1 cup unsweetened cocoa powder
5 cups powdered sugar
½ cup heavy cream
2 teaspoons vanilla extract
Directions
- Preheat oven to 350°F (175°C). Grease and line two 9-inch round cake pans with parchment paper.
- In a large bowl, whisk together the flour, sugar, cocoa powder, baking powder, baking soda, and salt.
- Add the eggs, milk, vegetable oil, and vanilla extract. Mix until smooth.
- Slowly stir in the hot coffee until fully combined. The batter will be thin.
- Divide the batter evenly between the prepared cake pans.
- Bake for 30–35 minutes, or until a toothpick inserted into the center comes out clean.
- Let the cakes cool in the pans for 15 minutes, then transfer to wire racks to cool completely.
- To make the frosting, beat the softened butter until creamy. Add the cocoa powder and mix well.
- Gradually beat in the powdered sugar, alternating with the heavy cream. Add vanilla extract and continue mixing until fluffy.
- Place one cake layer on a serving plate and spread a generous layer of frosting on top.
- Add the second cake layer and frost the top and sides of the cake.
- Refrigerate for 20 minutes before slicing and serving.
Notes
- Hot coffee enhances the chocolate flavor without making the cake taste like coffee.
- Make sure the cake layers are completely cool before frosting.
- For an even richer flavor, use dark cocoa powder.
- The cake tastes even better the next day after the flavors have had time to develop.
Common Questions
Can I Make This Ahead of Time?
Yes. I often bake the layers one day ahead and frost the cake the following day. The flavor actually improves overnight.
Can I Freeze It?
Absolutely. Both frosted and unfrosted cake freeze well. Wrap tightly to prevent freezer burn.
Why Is Coffee Used In Chocolate Cake?
Coffee deepens the chocolate flavor without making the cake taste like coffee. It’s a common trick used in many bakery-style chocolate cakes.
Can I Make It In A 9×13 Pan?
Yes. Bake the batter in a greased 9×13-inch pan for approximately 35 to 40 minutes.
How Do I Get Smooth Frosting?
Use softened butter and add the powdered sugar gradually. Beat the frosting until light and fluffy.
Can I Use Dark Cocoa Powder?
Yes. Dark cocoa creates an even richer flavor and darker appearance that resembles the movie cake.
Why Is My Batter Thin?
A thin batter is normal because of the hot coffee. It helps create the cake’s famously moist texture.
Final Thoughts
Every time I make this Matilda’s Chocolate Cake recipe, it brings back memories of watching that unforgettable scene in the movie and wondering how something could look so delicious. The finished cake feels just as dramatic and indulgent as I imagined.
The rich layers, creamy frosting, and intense chocolate flavor make it a dessert worth sharing with family and friends. If you’ve ever dreamed of tasting the famous movie cake, this homemade version comes wonderfully close.