The Best Fluffy Pancakes recipe you will fall in love with. Full of tips and tricks to help you make the best pancakes.
Amazon Affiliate Disclosure: This post contains Amazon affiliate links. If you click on a link and make a purchase, I may earn a small commission at no extra cost to you. I only recommend products I personally use and love. Thank you for supporting this blog!
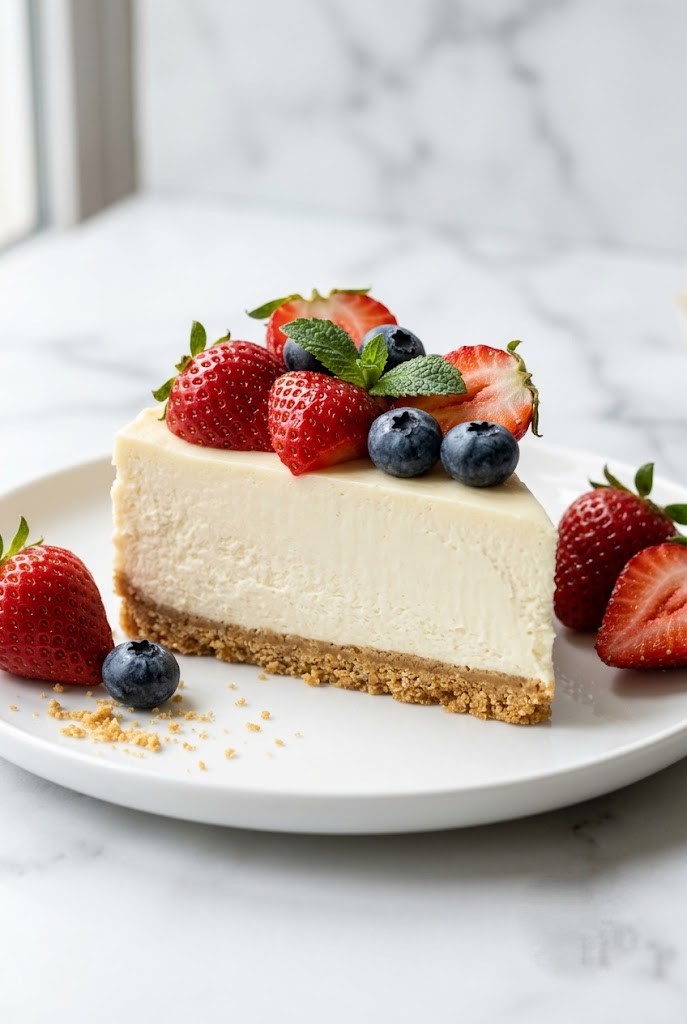
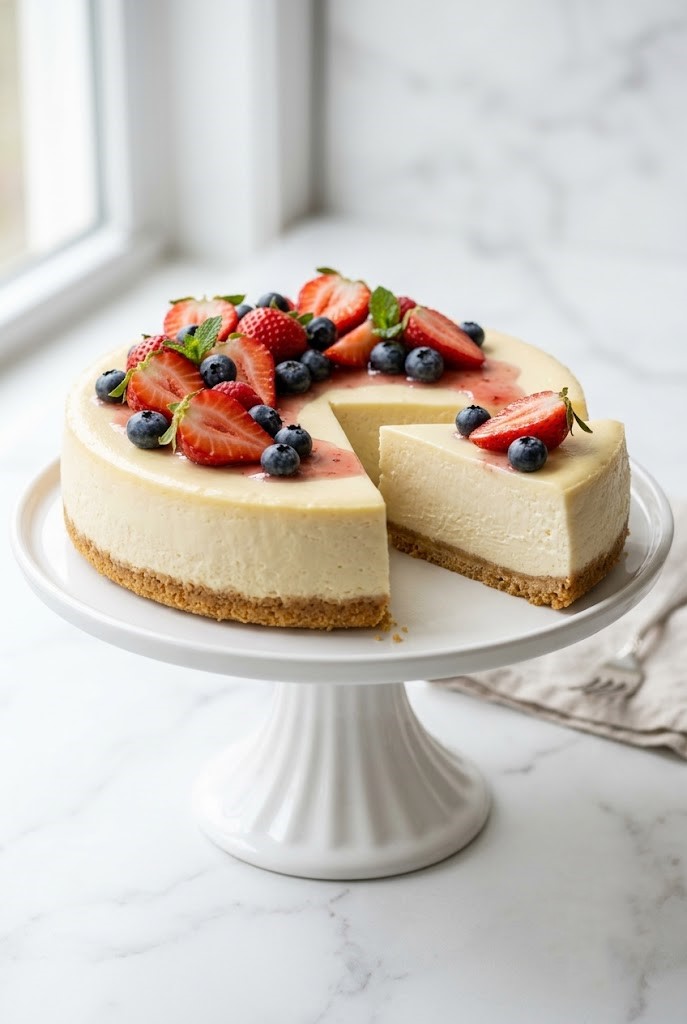
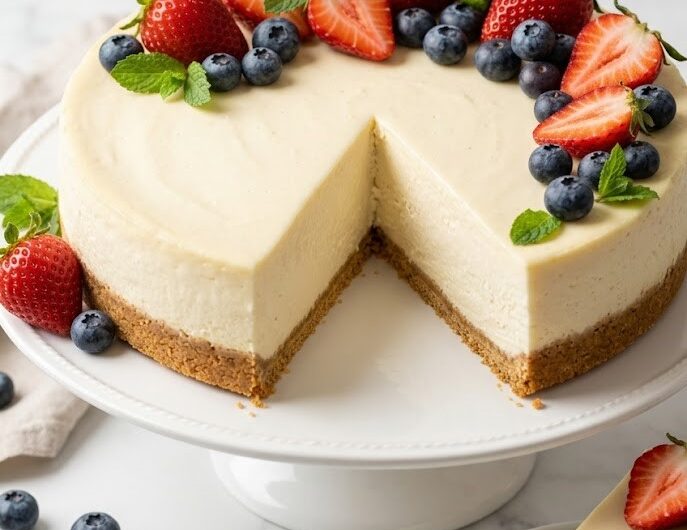
No bake cheesecake is one of the easiest desserts you can make, delivering a rich, creamy filling and a buttery graham cracker crust without ever turning on the oven.
It’s an excellent choice for summer gatherings, holidays, birthdays, potlucks, or any occasion when you need a reliable make-ahead dessert.
Jump to RecipeQuick Recipe Info
This one truly couldn’t be simpler — no special equipment, no water baths, no cracked tops. Just mix, chill, and serve. Here’s a quick overview before we dive in.
- Prep Time: 25 minutes
- Cook Time: 0 minutes
- Total Time: 25 minutes (plus 6–8 hours chilling)
- Servings: 10–12 slices
- Calories: ~420 per slice
- Protein: ~6g per slice
- Gluten-Free: No (use GF graham crackers to make it so)
- Dairy-Free: No
- Vegan: No
- Meal Prep Friendly: Yes
Why You’ll Love This Recipe
Every time I bring this to a gathering, someone asks me if I bought it. It honestly looks and tastes like way more effort than it is, and that’s exactly why I keep making it.
- Zero oven time — perfect for warm weather or when your oven is already busy
- Rich, creamy filling that sets up firm enough to slice cleanly
- Simple pantry and fridge ingredients
- Make-ahead friendly — actually tastes better the next day
- Endlessly customizable with different toppings and flavors
- Feeds a crowd with minimal effort
- No fancy kitchen skills required
Ingredients You’ll Need
I’ve tested this recipe more times than I can count, and these are the exact ingredients that give you that perfect creamy, sliceable texture. Don’t skip or swap anything on your first try — it really does matter.
Graham Crackers – 2 cups (about 14 full sheets), crushed Graham crackers form the classic base for this cheesecake. Crushing them fine gives you a crust that holds together beautifully when sliced. You can use a food processor to make quick work of this, or seal them in a zip-lock bag and roll with a rolling pin.
Unsalted Butter – 6 tablespoons, melted Melted butter binds the graham cracker crumbs together and adds a rich, slightly salty flavor to the crust. Make sure it’s fully melted but not hot when you mix it in.
Granulated Sugar – 2 tablespoons (for crust) Just a small amount of sugar in the crust balances the saltiness of the butter and adds a slight crunch. Don’t skip it — it makes a difference.
Cream Cheese – 24 oz (three 8-oz blocks), softened to room temperature This is the star of the filling. Full-fat cream cheese gives you the richest, most stable texture. Cold cream cheese will leave lumps in your filling no matter how long you beat it, so give it at least an hour out of the fridge first.
Powdered Sugar – 1 cup, sifted Powdered sugar dissolves completely into the cream cheese without leaving any grainy texture. Sifting it first prevents any clumps from sneaking in.
Vanilla Extract – 2 teaspoons Good vanilla extract transforms the flavor from plain to genuinely delicious. I use pure vanilla extract rather than imitation — the difference in taste is noticeable.
Heavy Whipping Cream – 1 cup, cold Cold heavy cream whips into stiff peaks and lightens the filling, giving it that signature airy-yet-dense cheesecake texture. The cream must be cold straight from the fridge for this to work properly.
Sour Cream – ½ cup Sour cream adds a subtle tang that makes the filling taste like a proper cheesecake rather than sweetened cream cheese. It also helps the texture stay smooth and creamy after chilling.
Lemon Juice – 1 tablespoon, freshly squeezed A small amount of fresh lemon juice brightens all the flavors and adds that classic cheesecake tang. Bottled juice works in a pinch, but fresh is noticeably better.
Optional Toppings
The cheesecake is delicious on its own, but toppings take it to another level. Fresh strawberries, blueberry pie filling, a drizzle of caramel sauce, or even a pile of whipped cream on top all work beautifully. Keep it simple or go all out — either way you’ll be happy.
How to Make It
This comes together in a few simple stages. The most important step is giving it enough time in the fridge to set — I know it’s tempting to rush, but overnight really is best.
Step 1: Crush the Graham Crackers
Add the graham cracker sheets to a food processor and pulse until you have fine, even crumbs. You want them to look like coarse sand — no large chunks remaining. If you don’t have a food processor, place the crackers in a sealed zip-lock bag and crush them with a rolling pin until fine.
Step 2: Make the Crust
In a medium bowl, stir together the 2 cups of graham cracker crumbs, 2 tablespoons of granulated sugar, and 6 tablespoons of melted butter until everything is evenly moistened. The mixture should hold together when you press a small amount between your fingers. If it feels too dry, add another teaspoon of melted butter.
Step 3: Press the Crust Into the Pan
Pour the crumb mixture into a 9-inch springform pan and press it firmly and evenly across the bottom and about an inch up the sides. Use the flat bottom of a measuring cup to pack it down tightly — a well-pressed crust won’t crumble when you slice. Place the pan in the freezer for 15 minutes while you make the filling.
Step 4: Beat the Cream Cheese
Using a stand mixer or a hand mixer, beat the three blocks of softened cream cheese on medium-high speed for about 2–3 minutes until it’s completely smooth and fluffy. Stop and scrape down the sides of the bowl at least once. There should be no lumps at this point — if there are, keep beating.
Step 5: Add Sugar and Flavorings
With the mixer on low, add the 1 cup of sifted powdered sugar, 2 teaspoons of vanilla extract, ½ cup of sour cream, and 1 tablespoon of fresh lemon juice. Increase the speed to medium and beat for another minute until everything is fully combined and smooth. Set this aside.
Step 6: Whip the Heavy Cream
In a separate clean bowl, pour the 1 cup of cold heavy whipping cream. Using clean beaters, whip on high speed until stiff peaks form — this takes about 3–4 minutes. The cream should hold its shape firmly when you lift the beaters. Don’t overwhip or it will start to look grainy.
Step 7: Fold the Whipped Cream Into the Filling
Add the whipped cream to the cream cheese mixture in two additions. Use a rubber spatula and fold gently — you want to keep as much air in the whipped cream as possible. Fold until no white streaks remain, being careful not to deflate the mixture. I use this cake turntable to make decorating and smoothing the cheesecake much easier and give it a clean, professional finish.
Step 8: Fill and Chill
Pour the filling into the chilled crust and spread it into an even layer using an offset spatula. Smooth the top as evenly as you can. Cover tightly with plastic wrap and refrigerate for at least 6 hours, but overnight is strongly preferred. The longer it chills, the cleaner it slices.
Nutrition Breakdown: What Makes This Recipe So Filling and Satisfying
Cheesecake is a genuine dessert — rich, indulgent, and totally worth every bite. Here’s a realistic breakdown per slice so you know exactly what you’re enjoying.
| Nutrient | Amount Per Serving |
|---|---|
| Calories | ~420 |
| Protein | ~6g |
| Carbohydrates | ~32g |
| Fat | ~30g |
| Fiber | ~0.5g |
| Sugar | ~22g |
Substitutions and Variations
One of the things I love most about this recipe is how adaptable it is. Once you nail the base, it’s easy to tweak it to suit different tastes, dietary needs, or whatever you happen to have on hand.
Instead of Graham Crackers
Digestive biscuits, Oreo cookies (filling removed or left in for a chocolate crust), shortbread cookies, or vanilla wafers all make excellent crusts. The ratio of crumbs to butter stays the same — just swap the crackers cup for cup.
Instead of Full-Fat Cream Cheese
Reduced-fat cream cheese works but will produce a softer filling that takes longer to set. Avoid fat-free — it doesn’t set properly and the texture suffers significantly. For a slightly tangy twist, you can replace one block of cream cheese with the same amount of mascarpone.
Instead of Sour Cream
Full-fat plain Greek yogurt is a great swap that adds a little extra protein. The flavor will be slightly tangier, which works beautifully in this recipe. Crème fraîche is another excellent option if you have it.
Instead of Powdered Sugar
If you want less sweetness, reduce to ¾ cup. You can also use a powdered erythritol or monk fruit sweetener in the same quantity for a lower-sugar version that still sets up properly.
Meal Prep Tips
This is one of my favorite desserts to make ahead, and honestly it’s better when you do. The filling becomes firmer, the flavors meld together, and it slices like a dream after a full night in the fridge.
Make the full cheesecake up to two days ahead and keep it covered tightly in the springform pan in the refrigerator.
Add any fresh toppings the day you plan to serve it so they stay bright and fresh. If you’re serving to a crowd, individual mini cheesecakes made in a muffin tin lined with cupcake wrappers are a fantastic make-ahead option — portion them out, stack in an airtight container, and refrigerate for up to three days.
Easy Variations
Once you’ve made the classic version, here are some directions you can take it depending on the occasion or the craving.
Strawberry No Bake Cheesecake
Fold 1 cup of finely chopped fresh strawberries into the filling right before adding it to the crust, and top the finished cheesecake with a layer of strawberry jam or fresh sliced strawberries. The filling takes on a beautiful pale pink color and the flavor is incredible.
Lemon No Bake Cheesecake
Increase the lemon juice to 3 tablespoons and add 1 tablespoon of lemon zest to the filling. It transforms the flavor into something bright and fresh — almost like a lemon curd cheesecake. Top with a thin layer of lemon curd before serving.
Chocolate No Bake Cheesecake
Use an Oreo cookie crust and fold ½ cup of melted and cooled semi-sweet chocolate into the cream cheese mixture before adding the whipped cream. Rich, decadent, and completely irresistible for chocolate lovers.
Lighter Version
Replace the heavy cream with a can of full-fat coconut cream (chilled overnight and whipped), use reduced-fat cream cheese, and swap the sour cream for plain Greek yogurt. The texture is slightly softer but still very good, and the calorie count drops significantly.
Serving Ideas
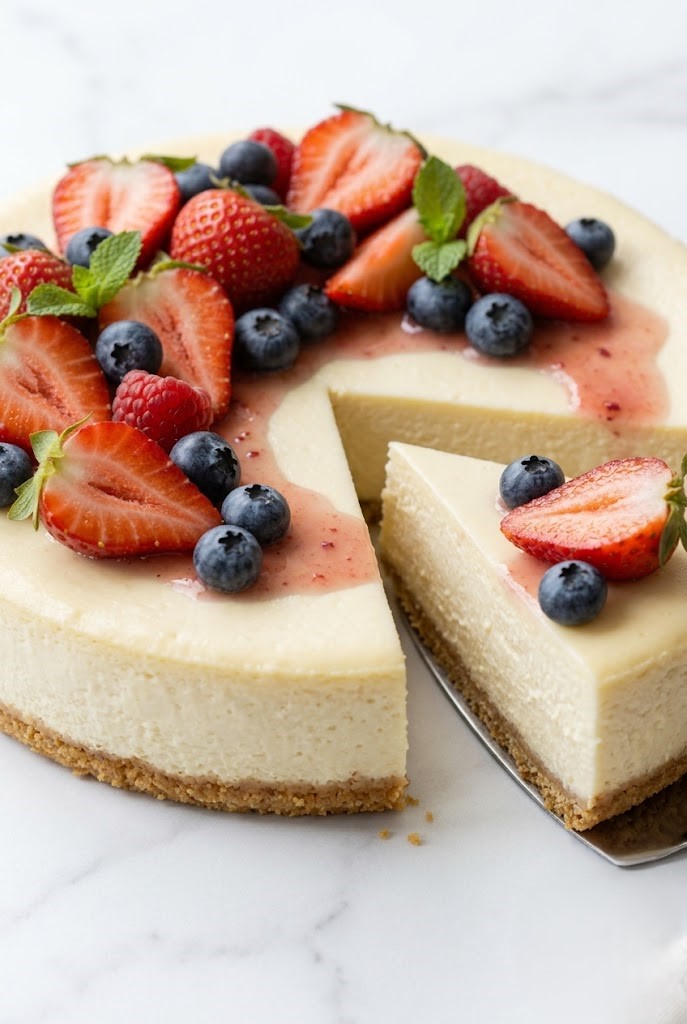
I love serving this cheesecake with just a few simple additions that make each slice feel special. A bowl of fresh mixed berries on the side is always a crowd-pleaser, and a light dusting of powdered sugar on top makes it look bakery-level without any extra work.
For a more dressed-up presentation, spoon a generous amount of cherry pie filling or blueberry compote over each slice right before serving. A small dollop of freshly whipped cream alongside it makes the whole thing feel luxurious. This cheesecake also pairs beautifully with a scoop of vanilla ice cream if you’re serving it as part of a larger dessert spread.
Storage and Leftovers
This cheesecake keeps really well, which makes it perfect for making ahead or enjoying over several days. Here’s how to keep it tasting its best.
Refrigerator Storage
Keep the cheesecake covered tightly with plastic wrap or in an airtight cake container in the fridge for up to 5 days. The filling stays creamy and the crust holds its texture throughout. Slice as needed and keep the rest covered.
Freezer Storage
This cheesecake freezes beautifully. Once fully set, slice it into individual portions and place them on a baking sheet lined with parchment paper. Freeze until solid, then transfer to a zip-lock freezer bag or airtight container. Frozen slices keep well for up to 2 months. Thaw individual slices in the fridge overnight before serving.
Reheating Instructions
No reheating needed — this is a cold dessert and tastes best straight from the fridge. If your slices have been in the freezer, transfer to the fridge the evening before you want to serve them and let them thaw slowly overnight. Avoid thawing at room temperature for more than 30 minutes, as the filling can become too soft.
Creamiest No Bake Cheesecake Recipe
Course: DessertServings
12
servingsPrep time
25
minutesChill Time
8
hoursCalories
420
kcalTotal time
8
hours25
minutesThis creamy no bake cheesecake features a buttery graham cracker crust and a rich, smooth cream cheese filling that sets perfectly in the refrigerator. It’s an easy make-ahead dessert that’s ideal for holidays, birthdays, potlucks, and summer gatherings—no oven required.
Ingredients
For the Crust
2 cups graham cracker crumbs (about 14 full graham cracker sheets)
6 tablespoons unsalted butter, melted
2 tablespoons granulated sugar
For the Filling
24 ounces (3 blocks) full-fat cream cheese, softened
1 cup powdered sugar, sifted
2 teaspoons pure vanilla extract
1 cup cold heavy whipping cream
½ cup sour cream
1 tablespoon freshly squeezed lemon juice
Optional Toppings
Fresh strawberries
Blueberries
Cherry pie filling
Caramel sauce
Chocolate sauce
Whipped cream
Directions
- Combine the graham cracker crumbs, granulated sugar, and melted butter until evenly moistened.
- Press the mixture firmly into the bottom and slightly up the sides of a 9-inch springform pan. Freeze for 15 minutes.
- Beat the softened cream cheese until smooth and creamy.
- Mix in the powdered sugar, vanilla extract, sour cream, and lemon juice until fully combined.
- In a separate bowl, whip the cold heavy cream until stiff peaks form.
- Gently fold the whipped cream into the cream cheese mixture until no streaks remain.
- Spread the filling evenly over the chilled crust and smooth the top.
- Cover and refrigerate for at least 6 hours, preferably overnight, until fully set.
- Slice and serve with your favorite toppings.
Notes
- Use full-fat cream cheese for the best texture and stability.
- Make sure the cream cheese is at room temperature before mixing to avoid lumps.
Common Questions
Can I Make This Ahead of Time?
Yes, and honestly I’d encourage it. This cheesecake is better after a full night in the fridge. The filling firms up, the flavors deepen, and slicing becomes much easier. You can make it up to 2 days ahead and keep it covered in the springform pan until you’re ready to serve.
Can I Freeze It?
Absolutely. This cheesecake freezes exceptionally well. Freeze it whole or in individual slices. Wrap tightly in plastic wrap and then in foil to prevent freezer burn. Thaw in the refrigerator overnight before serving — don’t rush it at room temperature or the texture can become slightly watery.
Why Didn’t My Cheesecake Set Properly?
The most common reason is that the heavy cream wasn’t whipped to true stiff peaks before folding it in, or the cream cheese was too cold and didn’t fully incorporate. Make sure your cream cheese is fully softened and your heavy cream is cold and whipped properly. Also ensure the cheesecake chilled for at least 6 hours — ideally overnight.
Can I Use a Regular Cake Pan Instead of a Springform Pan?
You can, but a 9-inch springform pan makes serving so much easier since the sides release cleanly. If you use a regular pan, line it with plastic wrap overhanging the edges so you can lift the whole cheesecake out before slicing.
Do I Need a Mixer, or Can I Make This by Hand?
A mixer — either a stand mixer or a hand mixer — really is necessary here. Beating the cream cheese to a smooth, lump-free consistency by hand is nearly impossible, and whipping the heavy cream to stiff peaks would take a very long time and a lot of energy. A hand mixer is the minimum tool I’d recommend.
What If I Don’t Have a Springform Pan?
A deep 9-inch pie dish lined with plastic wrap works as an alternative. Press the crust into the dish, fill it, and chill as directed. Use the plastic wrap to lift the cheesecake out once fully set, then slice and serve.
Can I Add Gelatin to Help It Set Firmer?
You can, but it’s not necessary if you follow the recipe as written with full-fat cream cheese and properly whipped heavy cream. If you live in a warm climate or want extra insurance, dissolve 1 teaspoon of unflavored gelatin in 2 tablespoons of warm water, let it cool slightly, and beat it into the cream cheese mixture before folding in the whipped cream.
Can I Make Mini Cheesecakes With This Recipe?
Yes! Line a standard muffin tin with cupcake liners, press about 1½ tablespoons of crust mixture into each cup, and divide the filling evenly among the cups. Chill for at least 4 hours. These are perfect for parties and portioning — the recipe makes about 16–18 mini cheesecakes.
Final Thoughts
If there’s one dessert I’d tell you to learn how to make from scratch, it’s this one. It’s genuinely easy, always impressive, and never fails to make people happy. The combination of the buttery crust and silky cream cheese filling is just timeless. It also makes a great addition to a dessert spread featuring rich treats such as Chocolate Cake for special occasions.
Give it a try the next time you need a dessert that does the work for you. Make it the night before, pull it out of the fridge when you need it, and watch it disappear. I think you’re really going to love it.