The Best Fluffy Pancakes recipe you will fall in love with. Full of tips and tricks to help you make the best pancakes.
Amazon Affiliate Disclosure: This post contains Amazon affiliate links. If you purchase through these links, I may earn a small commission at no extra cost to you. I only recommend products I genuinely use and love in my own kitchen.
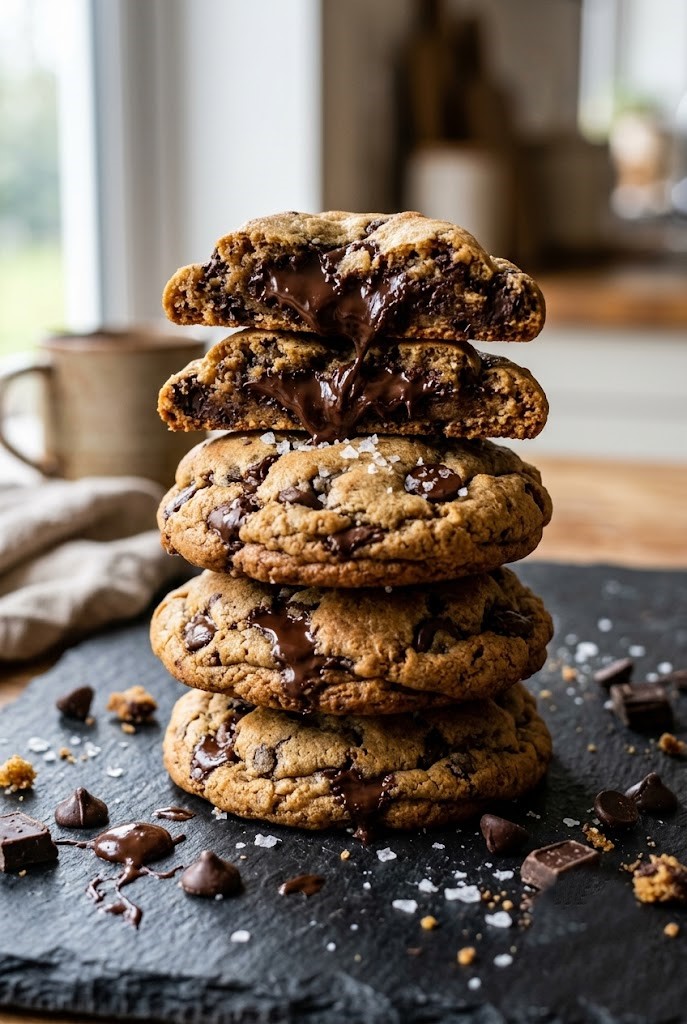
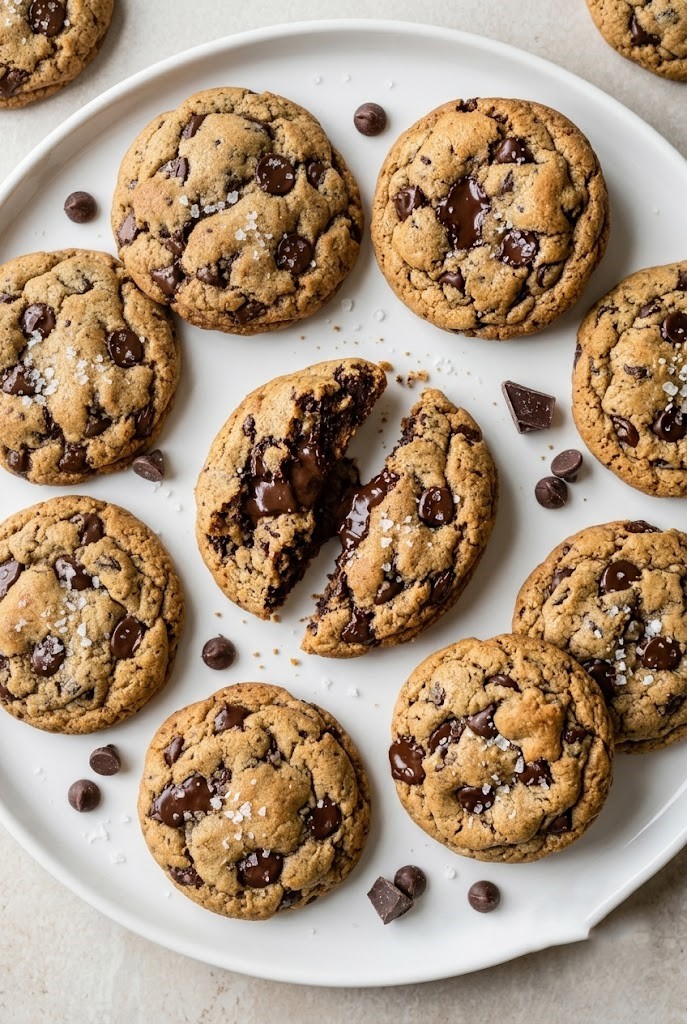
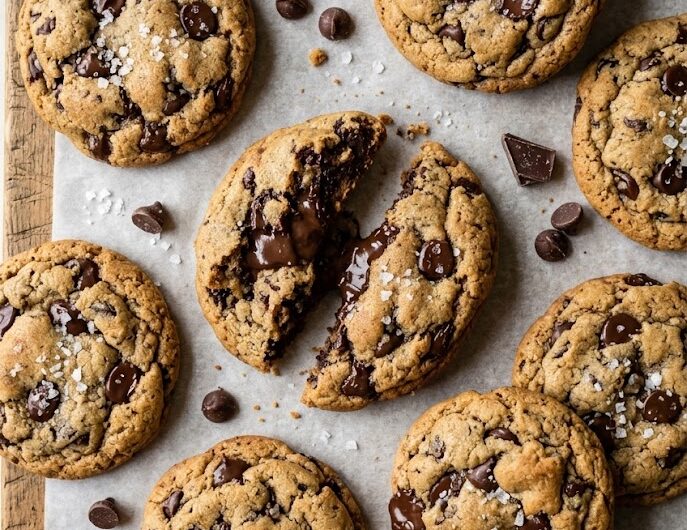
I’ve made hundreds of batches of chocolate chip cookies over the years, and nothing — absolutely nothing — compares to the moment I first tried browning the butter first. The difference is almost shocking. What started as a simple curiosity turned into the only chocolate chip cookie recipe I’ve made since.
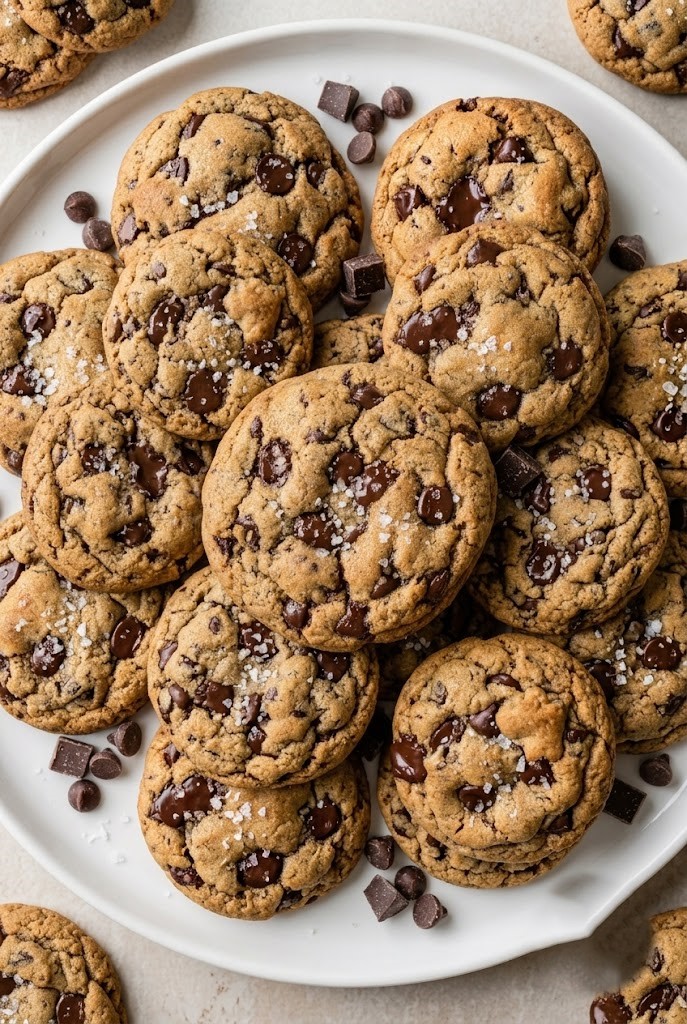
These cookies have that deep, toasty, almost caramel-like flavor that makes people ask “what’s your secret?” every single time. The brown butter adds a richness that regular melted butter just can’t touch, and paired with slightly underbaked centers, they’re genuinely hard to stop eating.
Jump to RecipeQuick Recipe Info
This is my go-to batch size for weekend baking — it makes enough to share without leaving you with cookies for a week straight. Here’s everything you need to know at a glance before you start.
- Prep Time: 20 minutes
- Cook Time: 11–13 minutes per batch
- Total Time: 45 minutes
- Servings: 24 cookies
- Calories: ~220 per cookie
- Protein: ~3g per cookie
- Gluten-Free: No
- Dairy-Free: No
- Vegan: No
- Meal Prep Friendly: Yes
Why You’ll Love This Recipe
Every time I bring these to a gathering, the recipe request comes before the plate is even empty. There’s something about that brown butter flavor that just hits differently — and the texture is exactly what a chocolate chip cookie should be.
- Rich, nutty brown butter flavor you can’t get any other way
- Crispy edges with a soft, gooey center
- Ready in under an hour — no overnight chilling required
- Uses simple pantry ingredients you probably already have
- Freezer-friendly — bake now, enjoy later
- Easily customizable with mix-ins and flavor variations
- Consistently perfect results even for beginner bakers
Ingredients You’ll Need
I’ve tested this recipe more times than I can count, and these are the exact ingredients that produce the best result every single time. Nothing fancy, nothing you need to hunt down — just quality basics used in the right way.
Unsalted Butter – 1 cup (2 sticks / 226g)
Browning butter is the entire magic of this recipe, and unsalted butter gives you control over the salt level. You’ll cook it on the stovetop until the milk solids turn golden and the kitchen smells like hazelnuts — that’s when you know it’s ready. I use a light-colored stainless steel saucepan so I can see the color change easily. Dark pans make it nearly impossible to tell when the butter is browned versus burned.
Brown Sugar – 1 cup (packed)
Brown sugar keeps these cookies moist and chewy while adding a subtle molasses depth that complements the brown butter beautifully. Make sure it’s packed tightly when you measure — loose brown sugar will give you a drier, flatter cookie.
Granulated Sugar – ½ cup
The white sugar helps the cookies spread properly and creates those perfectly crisp edges. The combination of both sugars is what gives you that ideal crispy-outside, chewy-inside texture that’s hard to resist.
Eggs – 2 large
Two whole eggs provide structure and richness. Make sure they’re at room temperature before mixing — cold eggs can cause the brown butter to seize slightly. I usually set mine out while I brown the butter and let it cool.
Egg Yolk – 1 extra
That extra yolk is the secret to an ultra-rich, fudgy center. It adds fat without the extra water that a whole egg would bring, which keeps the center soft and almost custardy even after the cookies cool.
Vanilla Extract – 2 teaspoons
Use real vanilla extract, not imitation. The flavor is noticeably better in a recipe where you’re going out of your way to layer in complex flavors like browned butter. It’s a small upgrade that makes a big difference.
All-Purpose Flour – 2¼ cups (270g)
Measuring by weight gives you the most consistent results. Too much flour is the number one reason cookies come out dry and cakey instead of soft and chewy — so if you’re using cups, spoon the flour in and level it off rather than scooping directly.
Baking Soda – 1 teaspoon
Baking soda helps the cookies spread and develop that golden-brown color on the bottom and edges. Make sure yours isn’t expired — old baking soda can leave you with flat, dense cookies.
Fine Sea Salt – 1 teaspoon
Salt is essential here. It balances the sweetness and actually makes the chocolate flavor more intense. Don’t skip it or reduce it — the cookies will taste flat without it.
Chocolate Chips – 2 cups
I prefer a mix of semi-sweet and dark chocolate chips for the best flavor balance. Using a good quality chocolate chip makes a real difference — I love Guittard or Ghirardelli for baking. Chocolate chunks or a roughly chopped chocolate bar also work beautifully if you want more dramatic melty pools of chocolate.
Flaky Sea Salt – for topping (optional but highly recommended)
A tiny pinch of flaky sea salt on top right before baking is a game-changer. It enhances every other flavor in the cookie and makes them look bakery-worthy. Maldon sea salt flakes are my go-to.
Optional Add-Ins
- Toasted walnuts or pecans (½ cup, roughly chopped)
- Espresso powder (1 teaspoon — deepens the chocolate flavor even more)
- Toffee bits (½ cup for a caramel-like crunch)
- White chocolate chips (½ cup mixed in with the dark for contrast)
How to Make It
The process is simple, but there are a few key moments where paying attention really matters — especially when browning the butter and knowing when the cookies are done. I’ll walk you through each step so yours come out perfect.
Step 1: Brown the Butter
Add 1 cup of unsalted butter to a light-colored saucepan over medium heat. Stir it constantly as it melts, foams, and starts to sizzle. After about 4–5 minutes, the foam will subside slightly and you’ll see golden-brown bits forming at the bottom — that’s the milk solids toasting, and it’s exactly what you want. The butter should smell nutty and rich. Immediately pour it into a large mixing bowl to stop the cooking, scraping every last bit of those browned bits from the pan.
Step 2: Cool the Butter and Mix in Sugars
Let the browned butter cool for about 10 minutes until it’s warm but not hot. Then whisk in 1 cup of packed brown sugar and ½ cup of granulated sugar until the mixture is smooth and glossy. This step also helps dissolve the sugars slightly, which contributes to that shiny, crinkled top on the finished cookies.
Step 3: Add the Eggs and Vanilla
Add 2 large eggs, 1 extra egg yolk, and 2 teaspoons of vanilla extract to the butter-sugar mixture. Whisk vigorously for about a full minute — you want everything fully combined and the mixture to look slightly lighter and a bit fluffy. Don’t rush this step. The emulsification here helps create the right texture in the final cookie.
Step 4: Add the Dry Ingredients
Switch to a spatula or wooden spoon. Add 2¼ cups of flour, 1 teaspoon of baking soda, and 1 teaspoon of fine sea salt directly to the bowl. Fold everything together until just combined — stop as soon as you no longer see dry streaks of flour. Overmixing at this stage develops gluten and can make the cookies tough instead of tender.
Step 5: Fold in the Chocolate Chips
Add 2 cups of chocolate chips and fold them in gently. The dough will be soft and slightly sticky — that’s completely normal and exactly what you want. If you’re adding any optional mix-ins like nuts or toffee, fold those in now too.
Step 6: Portion and Bake
Preheat your oven to 375°F (190°C) and line two baking sheets with parchment paper. I use a medium cookie scoop (about 3 tablespoons of dough) for uniform cookies that bake evenly. Place them about 2 inches apart and add a pinch of flaky salt on top if using. Bake for 11–13 minutes until the edges are set and golden but the centers still look slightly underdone — they’ll firm up as they cool on the pan.
Step 7: Cool on the Pan
Let the cookies rest on the hot baking sheet for 5 minutes before transferring them to a wire cooling rack. That resting time lets the centers finish setting from the residual heat without overbaking. Resist the urge to move them too soon — they’re fragile when hot and need that time to firm up.
Nutrition Breakdown
These cookies are definitely a treat, but knowing what’s actually in them helps you enjoy them without overthinking it. Here’s a realistic breakdown per cookie based on a batch of 24.
| Nutrient | Amount Per Serving |
|---|---|
| Calories | ~220 |
| Protein | ~3g |
| Carbohydrates | ~28g |
| Fat | ~11g |
| Fiber | ~1g |
| Sugar | ~18g |
If you add walnuts or pecans to the batch, you’re also getting a small dose of healthy omega-3 fats and plant-based protein, which makes the cookies feel a little more substantial as an afternoon snack alongside coffee or tea.
Substitutions and Variations
I’ve tested quite a few swaps over the years when I’ve run out of something mid-bake or needed to adjust for dietary needs. Here’s what actually works and what you should know before swapping.
Instead of All-Purpose Flour
A 1:1 gluten-free flour blend works surprisingly well in this recipe — the brown butter flavor carries through beautifully and the texture is only slightly different. Bob’s Red Mill 1-to-1 is my top pick for this swap. Almond flour doesn’t work as a direct substitute here since it behaves completely differently.
Instead of Granulated Sugar
Coconut sugar can replace the white sugar in equal amounts. The cookies will be slightly darker and have a hint of caramel flavor, which actually pairs nicely with the brown butter. Just note they’ll spread a little less.
Instead of Chocolate Chips
Roughly chopped chocolate bars make for more dramatic, irregular pools of chocolate and a slightly more upscale look and feel. A mix of 60% and 70% dark chocolate chopped into chunks is my personal favorite version of this recipe.
Instead of Extra Egg Yolk
If you don’t want to use an extra yolk, simply use 3 whole eggs instead. The cookies will be slightly less rich and fudgy in the center but still completely delicious — a small trade-off.
Meal Prep Tips
These cookies are genuinely one of the best things to keep on hand for the week, and they hold up really well when stored properly. A little prep upfront means you’re never more than 15 minutes away from a warm, fresh cookie.
The easiest approach is to scoop all the dough into balls and freeze them raw on a parchment-lined sheet. Once frozen solid (about 2 hours), transfer them to a zip-lock bag or airtight container and keep them in the freezer. When you want cookies, pull out however many you need and bake straight from frozen at 375°F — just add 2–3 extra minutes to the bake time.
If you’re prepping baked cookies for the week, store them in an airtight container at room temperature. Add a slice of white bread to the container — it sounds strange, but the cookies draw moisture from the bread and stay soft for days longer than they otherwise would.
Easy Variations
Once you’ve made the base recipe once, it’s easy and fun to tweak it into something slightly different. Here are a few of my favorite ways to change things up depending on the mood.
Espresso Brown Butter Cookies
Add 1 teaspoon of espresso powder to the dry ingredients. The espresso doesn’t make these taste like coffee — it just amplifies and deepens the chocolate flavor in a way that’s almost addictive. This is the version I make when I want to really impress someone.
Salted Caramel Version
Fold in ½ cup of toffee bits along with the chocolate chips, and don’t skip the flaky salt on top. The toffee melts into little pockets of caramel throughout the cookie and pairs incredibly well with the brown butter base.
Nutty Brown Butter Cookies
Toast ½ cup of roughly chopped walnuts or pecans in a dry skillet for about 3 minutes until fragrant, then fold them into the dough with the chocolate chips. The combination of brown butter, toasted nuts, and dark chocolate is one of the best flavor combinations in baking.
Double Chocolate Version
Replace ¼ cup of the all-purpose flour with ¼ cup of unsweetened cocoa powder. This turns the base dough chocolatey while the chocolate chips melt inside for an intensely rich, double-chocolate result. Use good-quality cocoa for the best results.
Serving Ideas
These cookies are perfect on their own, but there are a few ways to serve them that turn a simple cookie into a full dessert experience. I especially love these warm with something cold alongside them.
Serve them warm (10 seconds in the microwave works perfectly if they’ve cooled) with a scoop of vanilla bean ice cream sandwiched between two cookies for a homemade ice cream sandwich. They also pair beautifully with a cold glass of whole milk, a strong espresso, or a mug of dark hot chocolate on a cold afternoon.
For a casual entertaining dessert, arrange them on a board with squares of dark chocolate, a small dish of flaky sea salt, and some caramel sauce for drizzling. It looks impressive with almost no effort.
Storage and Leftovers
Good storage is what keeps these cookies tasting fresh rather than stale and crumbly. Here’s exactly how I store mine depending on how long I need them to last.
Baked cookies can be stored in an airtight container at room temperature for up to 5 days. If you’re stacking them, place a sheet of parchment between layers so they don’t stick together. They actually taste better on day two once everything has fully set and the flavors have melded.
Both baked cookies and raw cookie dough balls freeze well for up to 3 months. For baked cookies, let them cool completely before freezing in a single layer, then transfer to a freezer-safe bag or container. Thaw at room temperature for about 30 minutes, or microwave for 15–20 seconds for that fresh-from-the-oven feel.
Best Brown Butter Chocolate Chip Cookies
Course: DessertsCuisine: AmericanServings
24
servingsPrep time
20
minutesCooking time
15
minutesCalories
220
kcalThe nuttiest, richest chocolate chip cookie you’ll ever make. One extra step — browning the butter — transforms a classic into something truly unforgettable. Crispy edges, gooey centers, and a deep caramel-like flavor in every bite.
Ingredients
1 cup (226g) unsalted butter
1 cup packed brown sugar
½ cup granulated sugar
2 large eggs (room temperature)
1 egg yolk
2 tsp vanilla extract
2¼ cups (270g) all-purpose flour
1 tsp baking soda
1 tsp fine sea salt
2 cups semi-sweet chocolate chips
Flaky sea salt, for topping
Directions
- Brown the Butter: Melt butter in a light-colored saucepan over medium heat, stirring constantly. Cook 4–5 minutes until golden-brown bits form at the bottom and it smells nutty. Pour immediately into a large mixing bowl, scraping all the browned bits.
- Mix in Sugars: Cool browned butter 10 minutes. Whisk in brown sugar and granulated sugar until smooth and glossy.
- Add Eggs and Vanilla: Whisk in 2 eggs, 1 egg yolk, and vanilla extract for a full minute until slightly lighter in color.
- Add Dry Ingredients: Fold in flour, baking soda, and salt with a spatula until just combined. Do not overmix.
- Fold in Chocolate Chips: Gently fold in chocolate chips until evenly distributed.
- Scoop and Bake: Preheat oven to 375°F (190°C). Scoop 3-tablespoon balls onto parchment-lined baking sheets, 2 inches apart. Sprinkle with flaky salt. Bake 11–13 minutes until edges are golden and centers look slightly underdone.
- Rest and Cool: Let cookies rest on the baking sheet for 5 minutes before transferring to a wire rack.
Notes
- Don’t skip the cooling time for browned butter — adding eggs to hot butter will scramble them
- Pull cookies out when the center still looks underdone — they firm up as they cool and stay perfectly gooey
- For best flavor, rest the dough in the fridge for 24–48 hours before baking
Common Questions
Can I Make the Dough Ahead of Time?
Absolutely. The dough can be made up to 72 hours in advance and stored in the fridge in an airtight container. In fact, a longer rest in the fridge (called cold-proofing) deepens the flavor significantly — some bakers swear by a full 48-hour rest. Just let the dough sit at room temperature for about 15 minutes before scooping so it’s easier to work with.
Why Did My Butter Burn Instead of Brown?
Burned butter has a harsh, bitter taste that will ruin the cookies — so this is worth knowing how to avoid. The culprit is almost always too-high heat or walking away from the stove. Keep the heat at medium, stir constantly, and watch for the color change from golden to amber. The moment you smell a rich, nutty aroma and see those little brown bits at the bottom, pull it off the heat immediately. Using a light-colored pan (not dark non-stick) also makes the color change much easier to see.
Why Are My Cookies Flat?
Flat cookies are usually caused by butter that was too warm when you added the other ingredients, too little flour, or baking soda that’s past its prime. Make sure your browned butter has cooled to warm (not hot) before mixing in the sugars, measure your flour by spooning it into the measuring cup rather than scooping, and do a quick freshness test on your baking soda by dropping a pinch in hot water — it should bubble actively.
Do I Have to Use an Extra Egg Yolk?
You don’t have to, but it makes a noticeable difference in the richness and softness of the center. If you skip it, substitute with one additional whole egg (3 total). The cookies will still be great — just slightly less fudgy in the middle. It’s a small addition that’s worth keeping if you have eggs on hand.
What’s the Best Chocolate to Use?
My honest answer is: use whatever chocolate you genuinely love to eat. That said, semi-sweet chocolate chips (around 50–60% cacao) balance sweetness and intensity beautifully for most people. If you love dark chocolate, go for a 70% chip or chopped bar. I’d avoid milk chocolate chips in this recipe — the dough is already quite sweet and milk chocolate can make the overall cookie taste a bit cloying.
Final Thoughts
Brown butter chocolate chip cookies aren’t complicated — they just require a little more intention than the standard recipe, and that intention pays off in a big way. The toasty, nutty depth from the browned butter turns a classic cookie into something that feels genuinely special, and once you’ve had them this way, the regular version is hard to go back to.